Download my résumé as a Word compressed zip file and Adobe Acrobat. Need computer help? Book now to resolve most computer issues. Tech support jobs.
Macintosh OpenTransport Support.
This page is here for example purposes only, for an internet provider that previously offered dialup. Settings offered here may pertain to other dialup providers. Point them to this page for them to be able to offer you comparable settings for help. References to Smart.net were for when it offered dialup internet access. From my understanding, it presently doesn't offer it anymore. If the address above says index-site, please save the bookmark at macmaps.com.
Mac OS X users please go to the Mac OS X setup page
Please note, due to the number of images this page takes about two minutes to load at 14.4k bps, and 1 minute to load at 28.8k bps
Be sure to Save As from your web browser's File menu, and use Stuffit Expander (If you don't already have Stuffit Expander, e-mail me at me via my guestbook)
to expand the downloaded .sea.hqx file. If left with a .sea
file and no folder, double click the .sea file. Be sure to read the About
file that comes with the script for important installation information.
Before we resume, I assume you have a PowerMac with at least System 7.6 and 24MB of RAM. You will also need OpenTransport/PPP to be installed, and not have any other dialer installed. If you know this to be true, you may skip the preliminaries of how to find out if it is true by selecting this link.
If you don't have a
PowerMac, then please return to my MacPPP and MacTCP setup page. If you are switching to a PowerMac and transfering
your old software over to the new PowerMac, be sure to remove the MacTCP control panel, and any files that contain the name
PPP on the 68k Machine. All PowerMacs have four digit model numbers (1000-9999). To find out your System version and
RAM amount, click on the trash can icon at the bottom right hand corner of your screen, select About This Macintosh, or About This Computer from the rainbow colored Apple menu (from here-on called the Apple Menu) on the upper left hand corner of your screen, and let go of the mouse button. A Window should appear like this one
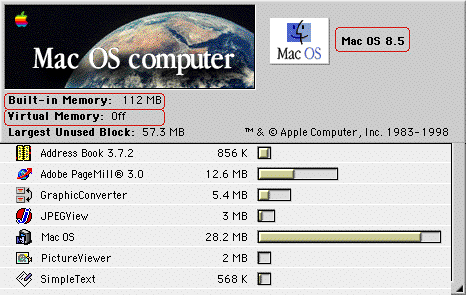
I have circled in red the important aspects of this window. The number following MacOS in the upper left is your system version.
If it is 7.6 through 9.2.2 you won't need to upgrade. If it is anything else, you will need to purchase an upgrade. If upgrading to 8.1 or above, you will need to remove Norton Utilities from your machine first. That is one program that is so incompatible with the newer operating systems that it will actually delete your hard disk contents! It is best also do a clean system install which is part of the installer settings of the new operating system's installer program. Some older operating systems may say Finder version followed by a number in that window, and that is the same as the MacOS version.
Built-in Memory should be at least 24 MB. If it isn't, you will need to upgrade. Please e-mail me at me via my guestbook if you don't know what you need for an upgrade, or you would like to find the best priced memory for your Mac model.
Virtual Memory is best left off. If it is on, you will need to visit your Apple menu and select from the Control Panels the Memory control panel and turn it off. RAM Doubler and RAM Charger are both commerical programs that can conflict with internet access, and are not recommended.
A few residual programs may exist if you upgraded from a machine previously connected to the net that had trouble with net connectivity. Do a find file for these residual programs if you think they might exist by selecting Find File or Sherlock from the Apple Menu and the following window should show up: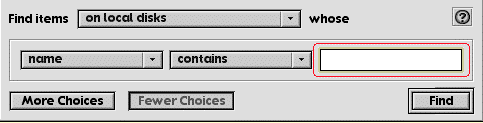
Click inside the white box to the right of the Contains, and then type the residual program's name followed by hitting the return key. When done searching each item quit from the Find File program by selecting Quit from the File menu. Here are the items you will need to search for:
TCP
PPP
If in the items found window you get any of the following:
MacTCP followed by a control panel on the same line
Config PPP
FreePPP setup
PPP followed by an extension or system extension
you will need to drag each and any of these items you find to the trash can on the bottom right hand corner of the screen, and empty the trash from the Special menu.
If you do not have the System 7.6 or later on CD-ROM, you will probably have trouble finding OpenTransport/PPP (OT/PPP). In that case you will need to download it from this link: OpenTransport/PPP dialer (http://download.info.apple.com/Apple_Support_Area/Apple_Software_Updates/English-North_American/Macintosh/Networking-Communications/Open_Transport/OT_PPP_1.0-Net_Install.sea.bin)
and install it by rebooting the computer with extensions turned off. To reboot with extensions turned off, Shut down your Mac, and hold the SHIFT key down as you turn it on. Part of the startup process will show in a window that Extensions are off. Otherwise install the software from CD-ROM by placing the CD-ROM into the drive, and hold down the C key during your startup.
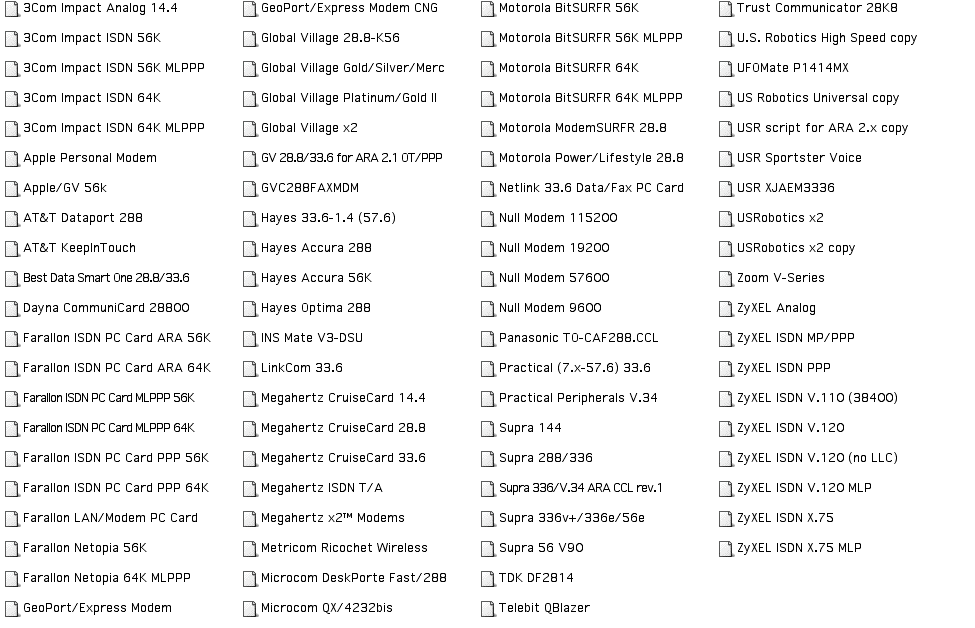
OpenTransport/PPP presently has a selection of modem scripts available in the MacOS 8.5 CD-ROM.
Also they can be provided by
For any other modems, contact the the modem's manufacturer to find out if a script is available for OpenTransport/PPP. Other modem scripts can be found on on this website as well.
Once you install OpenTransport and OpenTransport/PPP restart the computer.
Make a new folder on your computer for configuration scripts. NOTE THIS IS AN IMPORTANT STEP, IT
WILL COME TO PLAY LATER ON.
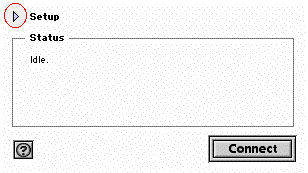
Now open the PPP control panel from Apple Menu's Control Panel's folder, MacOS 8.5 and i-Mac users select the Remote Access Control Panel
from the Apple Menu's Control Panel's folder. Remote Access users click on the triangle to the left of the setup label to get the full setup screen:
| PPP |
Remote Access |
|
|
 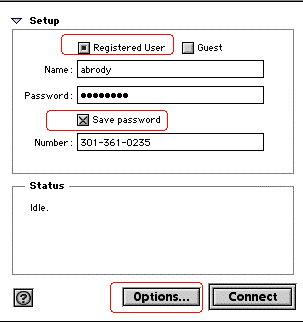 |
Items circled in red on these images for the benefit of people having trouble to locate the items being mentioned.
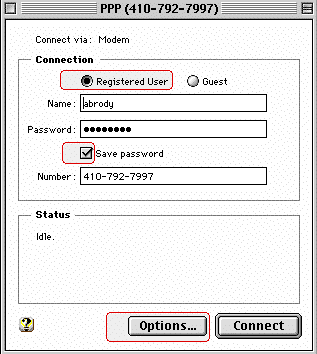
Make sure that the registered user appears checked or black dotted
as shown here. Name is the username you decide to use at your dialup internet provider
Password is that password. Passwords are hidden to prevent anyone
from tapping into your computer and finding out what your password
is. The heading of this window is a configuration which is set by going into the File menu's Configurations item, if you have local access to more than one of dialup internet provider' numbers
you wll want to edit those configurations so that you can switch between them if one of their lines is busy: 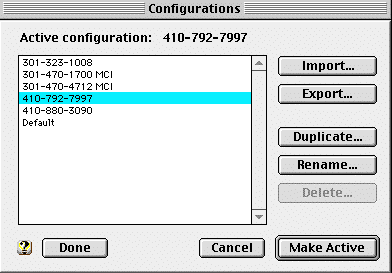
Above you will see that configurations were created for each of Smart.net's previous
dialup numbers. When you start out, you will have a default configuration, which you can Duplicate, and then rename to save as a different configuration. Click on the Done button for right now.
Go into your PPP menu (Remote Access menu for Remote Access users) and select Modem....:

Be sure to setup the port your modem is connected by
click in the popup menu that the USRobotics x2 currently appears in to select your
modem. That popup menu shows all the modems currently installed in the
modem scripts folder of your System Folder's Extensions Folder
It is best to not ignore dial tone, so that is unchecked as shown here.
Additional modem scripts can be found on this website as well.
Sound can be on or off. Most of the time you will have tone dialing.
Check with your phone company if you are unsure what type of dialing
method is in use. Quit from the file menu and Save the configuration when done.
Now from the PPP menu (Remote Access menu for Remote Access users) open the TCP/IP.... item.
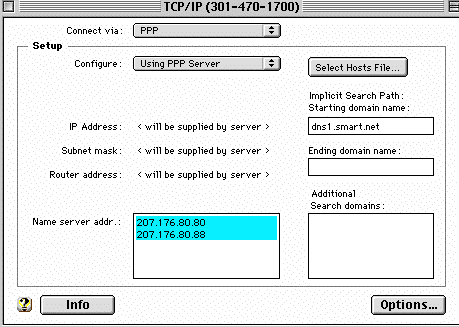
If what appears here doesn't match as far as selection, you will want to go into the Edit menu and
select User Mode. Change to advanced, and you will get a window like the one
shown above.
Select Connect via: "PPP"
Select Configure: "using PPP server"
Insert data into Name server add. (207.176.80.80, followed by a carriage return, 207.176.80.88) and Implicit Search path as shown (dns1.smart.net),
The name server address should be set to something like 205.197.48.80, followed by a carriage return with 209.136.132.88.
Quit from the File menu and Save configurations when done.
Now back to the PPP control panel (Remote Access control panel for Remote Access users)
| PPP |
Remote Access |
|
|
|
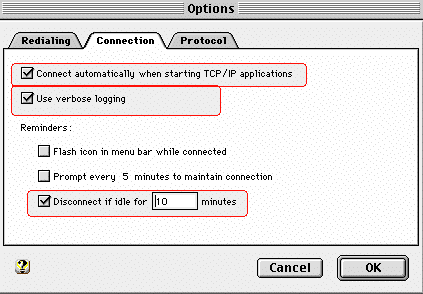
Select Options...
As you can see in this table, the layout of PPP control panel and Remote Access control panls options is slightly different. The images on the right are Remote Access, the Images on the left are PPP.
What's important here is that you check Connect automatically when starting TCP/IP applications in both, and that you check Allow error corection, Use TCP header compression,
and only check Disconnect if Idle for blank minutes if you find your modem is not staying conected. In the case you are disconnection, increase the number of idle minutes to as many as you
think you will be connected for while reading e-mail, or reading web pages without changing to new pages.
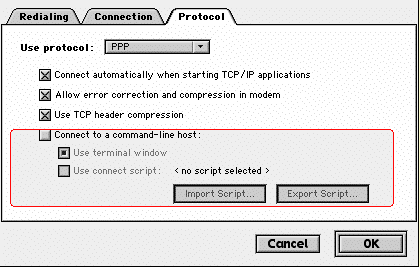
Using a connection script for non-PAP lines
Some ISPs may still require it. Check with your ISP if they do.
Check on Connect to a Command-line host from your Protocol window, and check Use terminal window.
Click on OK
Connect from the main PPP window or Remote Access window (whichever one is applicable)
A terminal window will appear:
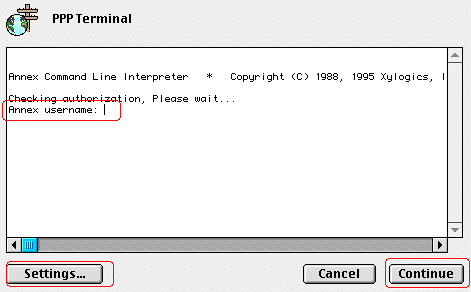
Click on Settings before doing anything else
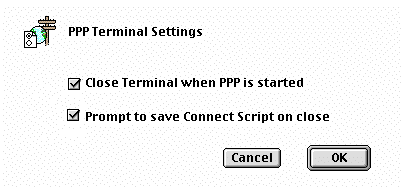
Also check Prompt to save Connect Script on Close.
Click OK.
Enter in your username and password as prompted. You will get a similar screen in the terminal window
to the one below when done.
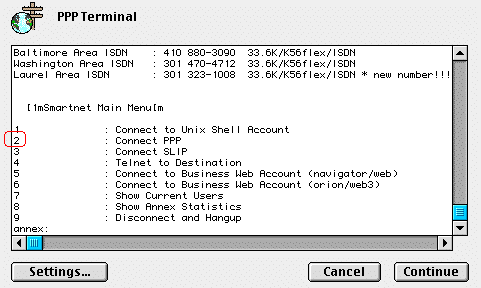
Type in the number that appears in the menu to Connect PPP. In this case it is the number 2.
When connecting resumes, click the Continue button.
Save your script to the configuration scripts folder you created during installation.
Give it a name like the phone number you dialed using this configuration.
Now Disconnect.
Open the the Options button and Protocol tab again:
| PPP control panel |
Remote Access control panel |
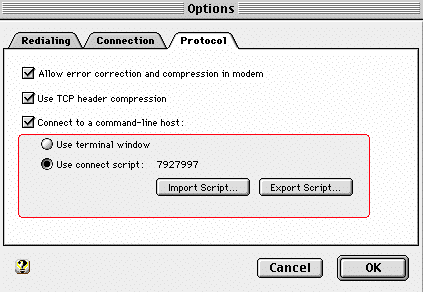 |
 |
Now check Use Connect Script, and click on import the script you saved into your configuration scripts folder.
Click OK.
Quit from PPP (or Remote Access) and save your configuration.
Any questions, please e-mail me via my guestbook
>
or an additional 500 Macintosh related sites at http://www.macmaps.com/mac.html
Return to top |


